This tutorial explains you to communicate with people using Jitsi Video Conference via the internet. I hope this short guide helps everyone in this time of worldwide COVID-19 pandemic.
Requirements
- 1) Web browser
- 2) Enough internet access
- 3) Earphone with microphone capability
Jitsi Advantages
- Gratis
- Instant (browser based), does not need additional application
- Universal, any device any operating system can use
- Video conference
- Voice conference
- Multiple participants
- Text chat
- Share screen in both ways
- Easy invite other person(s)
- Room administration (room password, first user is admin, kick, mute/unmute to participants)
1. Create New Room
- Go to https://meet.jit.si
- Type "Chatroom" without quote. This will be name for your communication room.
- Click GO button.
- Wait for few seconds loading.
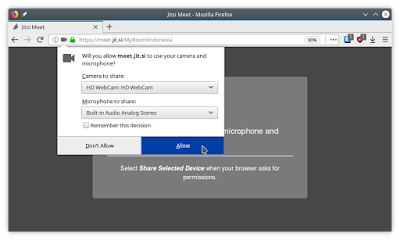
- Browser asks for microphone and webcam.
- Click ALLOW button.
- You entered Jitsi communication room.
- You see address bar displays "https://meet.jit.si/Chatroom" and that is your room address.
Picture 1.1
(Example: here the chatroom is named MyRoomIndonesia)

Picture 1.2
(Example: on GNU/Linux KDE system with Firefox version 69 the webcam + microphone permissions are displayed like that)
Picture 1.3
(Example: this is how a Jitsi chatroom looks initially with only one person joined; notice that you can give password to the room by Add Password button on below)
2. Create Your Name
- At this point room displays only one person named "me" which is you.
- Click triple dot button on most bottom-left corner.
- Click Settings.
- Appears a new dialog named "Settings".
- Click Profile tab.
- Type "MyNameIsHere" or such unique name which your friend will see as you.
- OK.
- Your name changed as displayed on top-right corner of screen.
Picture 2.1
(Example: here is how one changes his/her name on Jitsi Video Conference)
3. Copy Jitsi Address
- See your room address that looks like "https://meet.jit.si/Chatroom".
- Copy that address.
Picture 3.1
(Example Jitsi address and how to copy it)
4. Tell Your Friend
- Send the address to your friend.
- Invite your friend to do three things: 1) open the address in web browser, and 2) click Allow button for microphone and webcam and 3) change his/her user name.
- Invite other friends the same way.
Picture 4.1
(Example: this room is ready to serve communication between people)
5. Go Communicate
- You can speak with your friend now using your microphone.
- You can also see each other's face if you didn't disable webcam.
- To disable either microphone or webcam, click either microphone or camera button on the bottom.
- To end communication, click Red button (middle among three) on bottom.
6. Share Screen
- For you to see your friend's computer screen activity on your screen, ask him/her to press Share Screen button on most bottom-left corner and select Entire Screen from selection appears.
- For your friend to see your screen activity on his/her screen, click Share Screen and select Entire Screen.
Useful Resources
What you need to know is that Jitsi is Free Software meaning it gives the users complete freedom up to the source code and as consequence there are many Jitsi servers on the internet offered gratis by people aside from the official above. What is the purpose? The purpose is they act as alternatives if the official one does not satisfy your communication especially when your internet is bad. The steps to communicate are the same but only the server addresses are different. You can find more information at:
- List of other Jitsi servers
- More List of Jitsi servers (etc.)
- FSF Europe's article on Jitsi (including Mumble, BigBlueButton, etc.)


