I do not find any Gogs getting started documentation for user unlike GitHub's. If you want to start using Gogs as replacement to GitHub, this basic tutorial is for you. This is applicable to Notabug.org and other code hostings that use Gogs as its underlying software. By basic this tutorial covers only activities done individually via web browser. It does not cover activities done collectively –such as pull request or migration– nor via command line –such as cloning–. So here you will learn how to create a repository, commit, issue, and release, after signing up and logging in. You can also do Continuous Integration and read more resources at the bottom. I believe this should be enough as a starter. Happy hacking!
Subscribe to UbuntuBuzz Telegram Channel to get article updates directly.
[ See also: Alternative World | Computers | Ethical Code Hosting | Quitting GitHub Help | NixNet-alike | Librehost | Gafam Solutions | Jitsi | BigBlueButton ]
Index
- Register
- Login
- See your profile
- Create a repository
- Create project description
- Commit
- Create a release version
- Go back to previous version
- Manage an issue
- Continuous Integration
What is Gogs?
Gogs is a web software with functionalities similar to GitHub which everybody can download. Notabug.org is a GitHub-like service based on Gogs that everybody can join. By using Gogs (self-hosting) or simply Notabug.org (no self-hosting) you can migrate from GitHub to continue software development.
Notabug.org features:
- Free software, free service
- No proprietary Javascript, no Google Analytics, no reCaptcha
- All standard features of Git like commit, push, pull request, etc.
- Can be used either to host software or non-software files
- Similar user interface to GitHub
- Public and private repository
- Migration
- Organization
- Issues
- Wiki
- Releases
- Milestones
- Star, watch, fork
- Explore public repositories
- SSH identities and 2FA
1. Register
Registration in Gogs is very straightforward and without Google reCaptcha.
- Go to notabug.org
- Click Sign Up link
- Type a desired username
- Type your email address
- Type desired password
- Type desired password once again
- Type captcha displayed
- Click the green Create New Account button
- Follow activation link sent to your email
- You are registered, congratulations!
Registration form:
2. Login
- Go to Sign In page
- Type your username and password
- Click the green Sign In button
- You are logged in

3. Your Profile
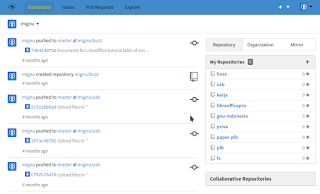
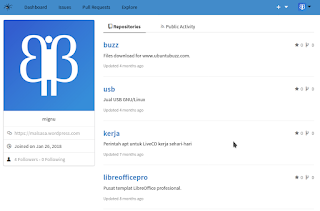
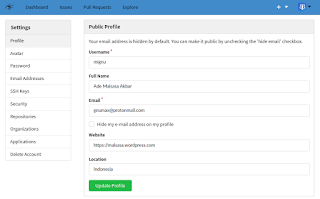
Once logged in, you will see your dashboard. From dashboard view, you can go to your Profile and Settings. You can see list of your projects, your avatar that displayed to other users, and change multiple settings like SSH identities and webhooks.
Dashboard:
This shows your activity history and repositories you have.
Profile:
This shows summary of yourself including avatar, biography, and personal website.
Settings:
This is where you change your profile, password, and various setups.
4. Create New Repository
To create a repository is to create a place for your source code or files.
- Make sure you are logged in to Gogs
- Click plus button on the top panel > New Repository
- Alternatively, visit special URL notabug.org/repo/create/.
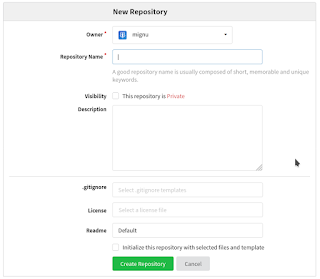
- You see a new form titled New Repository with several text boxes and green button Create Repository.
- Set owner which is you.
- Set repository name for example "AliceWare" or "BobSoft" or "CharlieCode".
- Set visibility unchecked as we do not want to make private repository.
- Set description for example "This is my program AliceWare licensed under GPL".
- Set .gitignore unchanged.
- Set license for example GNU GPL v3.0.
- Set readme default.
- Set initialize this repository... checked.
- Click the green Create Repository button.
- A new repository created.
New Repository form:
5. Commit
To commit is to save every change with description.
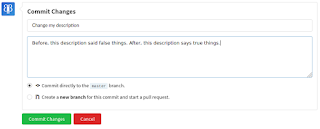
- You see Commit Changes section on web page.
- Type a title that describe your change.
- Type detailed information about your change in the text box below title.
- Let the Commit directly... and Create a new branch... options unchanged.
- Click the green Commit Changes button.
- Commit done.
Commit form:
6. Create new file
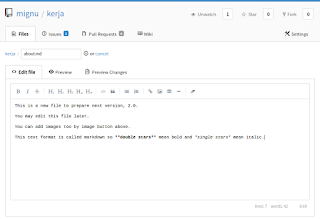
- Click the blue New File button located over the file list section.
- Type file name for example mycode.cpp or mydescription.md.
- Insert text you want to type in the big text box.
- Alternatively, click the blue Upload File button to upload file such as pdf, png, mp4, etc.
- Commit.
File creation form:
7. Create an Issue
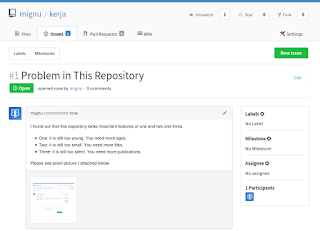
To make an issue is to report something in a repository. It could be a bug report, feature request, or even only a note reported either by you or by users. By this, Gogs makes you easy to track all reports in one place.
- Go to your repository.
- Click Issues tab under your repository name.
- Click the green New Issue button.
- Type the title of your report in the first text box.
- Type the detailed message of your report in the bigger text box under it.
- Optionally, click upload button to upload picture or document that supports your report.
- Click the green Create Issue button.
- Issue created.
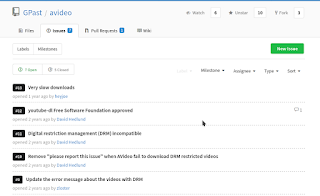
Example repository with multiple reported issues:
8. Release
To release is to save a version of a change among changes. For example, your new repository can be released as 1.0, and then add a new file to release the repository as 2.0, then add a new file and release the repository as 3.0 and so on. You can go back to your repository in previous time by opening a saved among saved ones (a release among releases). The language "release" is sometimes also called "tag".
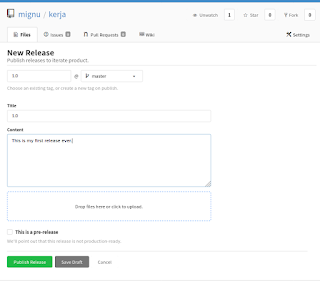
To make a release:
- Make sure you are logged in and is on the repository
- Click Release button on the same line as Commit and Branch buttons
- Click the green New Release button
- Type version number in the first textbox
- Set branch unchanged
- Type title box same number as version number
- Type content box description of this release
- Do not change upload section
- Do not change pre-release option
- Click the green Publish Release button
Release form:
Repository with one release:
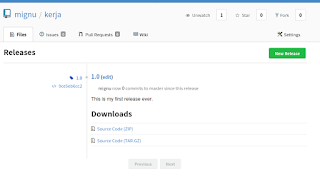
9. Continuous Integration
Continuous integration is the technology we know as Travis CI at GitHub: an automatic system to build software. Fortunately, if you want to code like at GitHub with Travis CI, you can do similar thing at Gogs with other CI too as these tutorials explained:
- Gogs and Jenkins CI (by Salohy)
- Gogs and Drone.io CI (by Drone.io)
About This Article
This tutorial is a basic guide I think should be existed in the official documentation of Gogs. It should cover basic things such as registering, making a repository, and committing. I make this tutorial so everybody could use Gogs especially those without prior experience. I hope this tutorial helps people quit GitHub. I would love to say thanks a lot to Hein-Pieter the founding father of Notabug.org and to Peers.Community (where Dragora and Libreboot projects are members of) that introduced it to me. I would love to say big thanks to Unknwon and Lunny the inventors of Gogs.
Further Readings
- GitHub Official Documentation - mostly can be applied to Gogs to a certain degree.
- Git Basics - the most basic beginner's guide to Git the real software behind Gogs and GitHub.
- Git Basics, Simplified - another good basic guide that is clean and straightforward.
- Git Rescue - quick commands to save yourself when doing something wrong with your Git repo.
- Gitea - a modification to Gogs which is now more popular and has more features.
- Awesome Continuous Integrations - list of CI services available on the net (Jenkins included).
This article is licensed under CC BY-SA 3.0.


